Home Made Reese’s Eggs Repost


TUESDAY, MARCH 12, 2013

Homemade Reese’s Eggs

Growing up, our favorite treat in our Easter baskets were Reese’s Eggs. They only come out for a few months each year, but with this recipe, I can eat them all year long!

Ingredients
3 Cups powdered sugar
1 1/2 Cups creamy or crunchy peanut butter
1/4 cup butter or margarine, melted
2 Tablespoons milk
oval or egg-shaped cookie cutter
1-2 bags milk chocolate chips (11 oz. each), divided
2 Tablespoons shortening

Directions
Beat powdered sugar, peanut butter and butter together.  Dough will be crumbly.  Add two tablespoons of milk and continue to beat together, until the dough softens.  (Note, dough will still be crumbly- this is fine!)
Working with about 1-2 cups of dough at a time, roll the dough into about 1/2 inch thickness on a flat, floured surface, and use cookie cutter to make eggs.
Place the eggs on a cookie sheet and chill in freezer for at least one hour.
When ready to dip, melt 1 bag of milk chocolate chips with 1 tablespoon of shortening in a  microwave.  You may need a bit more shortening to thin it out.
Dip each egg, covering completely, and place on wax paper until set.
If you need more chocolate, melt second bag with more shortening.
I got about 20 eggs using my cutter and rolling to 1/2” thickness.

The amount of chocolate needed will vary, again, based on thickness and shapes of eggs.


Adapted from: Blog is the New Black

Looking for More Easter Treats? Here are some of our favorites:
I am a recipe finder today…woo hoo…I so wish I could make these corn free lol…
Hope you enjoy
Tammye Honey

An Irish Dessert


So today I am all about the Irish…Hey now my last name is Green lol…

This one is courtesy of another great site I love http://www.chow.com

Chocolate Guinness Cupcakes


Chocolate Guinness Cupcakes

Adapted from Dave Lieberman

I love cooking with beer, and that’s no exception when it comes to desserts. Of all beers, Guinness is the perfect one for desserts because of its distinct chocolate and coffee notes. Pairing it with actual chocolate is the obvious choice. These cupcakes are light in texture but heavy in the chocolate department. The white cream cheese icing reminds me of the creamy white head that Guinness is famous for.

This dish was featured as part of ourSt. Patty’s Day Recipes photo gallery.

TIME/SERVINGS
Total Time: 50 mins
Active Time: 25 mins
Makes: 24 cupcakes

INGREDIENTS
For the cupcakes:
Unsalted butter, melted, for coating the muffin pans (optional)
1 (11.2-ounce) bottle Guinness stout
1/2 cup whole milk
1/2 cup vegetable oil
1 tablespoon vanilla extract
3 large eggs
3/4 cup sour cream
2 1/2 cups all-purpose flour
2 cups granulated sugar
3/4 cup natural unsweetened cocoa powder
1 1/2 teaspoons baking soda
1/2 teaspoon fine salt

For the frosting:
1 (8-ounce) package cream cheese, at room temperature
Pinch fine salt
1/3 cup heavy cream
1 pound powdered sugar
Natural unsweetened cocoa powder, for dusting

INSTRUCTIONS

For the cupcakes:

  1. Heat the oven to 350°F and arrange a rack in the middle. Place cupcake liners in two (12-well) muffin pans; alternatively, coat the wells with melted butter. Set the pans aside.
  2. Whisk together the Guinness, milk, vegetable oil, and vanilla in a large bowl until combined. Whisk in the eggs, one at a time, until completely incorporated. Whisk in the sour cream.
  3. Whisk the flour, sugar, cocoa powder, baking soda, and salt in a second large bowl to aerate and combine. Gradually fold this mixture into the wet Guinness mixture. Divide the batter among the muffin wells.
  4. Bake until a toothpick inserted into the center of the muffins comes out clean, about 20 to 25 minutes. Set the pans on a wire rack and let the cupcakes cool completely before removing from the pans.

For the frosting:

  1. Place the cream cheese and salt in the bowl of a stand mixer fitted with a paddle attachment and beat on medium speed until light and fluffy, about 2 minutes. With the mixer on medium speed, gradually beat in the heavy cream until smooth, about 1 minute. Scrape down the sides of the bowl with a spatula. With the mixer on medium speed, gradually mix in the powdered sugar until completely incorporated and smooth, about 3 minutes.
  2. Top each cupcake with a heap of frosting and dust with cocoa powder.

Happy Baking and preparing for your festivities… hope this helps

Tammye Honey

Recipes in Time for St. Patrick’s Day


No Pinching Here: Five Green Dishes for St. Patrick’s Day!

Mar 13, 2013
1 OF 7


Hello Everyone!

Looking for a green dish to help you celebrate St. Patrick’s Day? Look no further.

We’ve got five recipes that won’t get you pinched, all created by Real Women like you in our wonderful online cooking community!

Click through our slideshow to get recipes for these delicious green dishes and test your Irish food knowledge on each slide—answers are at the end, tell us how many you got right!

Smashed Peas & Mint

Attached Recipe Photo
MEHMEH

posted Oct 15, 2010

I love peas mostly fresh but frozen too. I even grew my own for awhile… so good. One day while visiting my parents, my mom (not a huge veggie fan) said let’s do something different with the peas… mashed… maybe?….it has been a family favorite since then…

INGREDIENTS

  • 10 ounces 2 – 10 oz bags frozen peas
  • 1 cup milk
  • 4 ounces PHILADELPHIA Cream Cheese
  • 5 tablespoons butter
  • 2 tablespoons mint, finely chopped

DIRECTIONS

  1. Thaw and drain the peas
  2. In a medium saucepan roughly mash the peas; Add the butter, 1 tsp salt and 1/8 tsp ground pepper and cook over low heat
  3. Add the cream cheese and milk until well blended; Add the mint, stirring until bubbly

Green Beans and Sautéed Potatoes


Smoky bacon, hearty potatoes, fresh cut green beans—we’ll be honest, you’re going to want to make this for St. Paddy’s day and then some…

GET THE RECIPE

Fresh Cut Green Beans, Sauteed with Potatoes, Bacon and Onions

Attached Recipe Photo
Rebecka EvansRebecka Evans

posted Aug 1, 2012

This recipes is one of my favorite summer fresh creations. Filled with flavorful memories of hot summer days in the garden with mom, the crisp cut green beans snap alongside the creamy texture of the sauteed potatoes and onions. Bacon rounds out the dish with its savory smoke flavor. The simple flavors of summer express themselves in perfect harmony in this basic side dish!

INGREDIENTS

  • 1 pound fresh cut green beans
  • 1 medium onion
  • 4 medium potatoes
  • 1/4 pound bacon
  • 2 tablespoons butter
  • 2 scallions
  • 1/4 cup red wine vinegar

DIRECTIONS

  1. Cook bacon in a large cast iron skillet over medium heat until crisp, remove bacon and all but 1 tablespoon bacon fat
  2. melt 1 tablespoon butter in pan
  3. add potatoes and onions and cook covered, stirring frequently until potatoes are tender but not soft
  4. add cut green beans, remaining 1 tablespoon butter, cover and cook for 12-15 minutes, stirring occasionally
  5. salt and pepper to taste
  6. serve with red wine vinegar, garnish with chopped scallions

Lettuce Soup


Serve up a warm bowl of green soup. Fresh mint, broth, iceberg lettuce—your taste buds will thank you.

GET THE RECIPE

Minty Lettuce Soup

Attached Recipe Photo
MEHMEH

posted Sep 24, 2010

I love serving soup in a shot glass as an appetizer. You would never guess it’s lettuce. How many times have you had to throw out the lettuce because it turned brown in the crisper (or rotter as I call it)? Now you can put it to delicious use.

INGREDIENTS

  • 2 heads iceburg lettuce, roughly chopped
  • 1 cup onion, sliced
  • 1/2 cup packed fresh mint
  • 6 cups chicken broth
  • 2 tablespoons butter
  • 2 tablespoons all purpose flour
  • 4 ounces PHILADELPHIA Cream Cheese

DIRECTIONS

  1. Put the lettuce, onion, mint and chicken broth in a large pot
  2. Bring to a boil then lower heat to medium and simmer for 25 minutes
  3. Let cool slightly then place in a blender for one minute and strain the soup. (You will have to do this in 2 stages to not fill the blender too much) set aside;
  4. Melt the butter in a medium pan over medium heat, add the flour and stir one minute
  5. Add the soup and stir to combine. Bring to a boil, stirring constantly
  6. Remove from heat, add the cream cheese and salt & pepper to taste
  7. Tip: You can serve this soup in shot glasses; add a sprinkle of parmesan cheese and a fresh mint leaf to decorate
  8. Tip: You can use any lettuce you have on hand and for a vegetarian meal you can use vegetable broth

Green Guacamole


Rich and creamy guacamole? Make an extra batch because you won’t be able to put this down!

GET THE RECIPE

Awesome Guacamole

Attached Recipe Photo
Erika ChristianErika Christian

posted Aug 3, 2012

Rich and creamy guacamole, hard to stop eating!

Tags: None

INGREDIENTS

  • 8 ounces Philadelphia whipped cream cheese
  • 3 Ripe avacadoes
  • 1 packet of guacamole seasoning mix (your choice)
  • 1 pinch garlic salt (season to your taste)

DIRECTIONS

  1. Peel and remove seed from avacadoes then mash in a bowl.
  2. In the same bowl mix in the whipped cream cheese.
  3. Stir in seasoning packet and garlic salt.
  4. Place in fridge for 20 min to bring out flavor.
  5. Serve with tortilla chips and enjoy!

Green Brownies


They’re rich with chocolate and they’re green? What’s the special ingredient that makes these brownies pinch-free? Find out…

Green tea Cream cheese Brownies

Attached Recipe Photo
Yumiko EtoYumiko Eto

posted Sep 16, 2011

These brownies are rich and chocolaty, and absolutely fabulous! Green tea cream cheese mixtures make these brownies outstanding! A little bite is not enough. Every time I make these brownies, I put them as snack’s in my girls’ school lunches. After they come back from school, they tell me, ” Mommy, those brownies are very popular among my friends! Next time put more brownies in my lunch, PLEASE!!”

INGREDIENTS

  • 5 ounces Philadelphia Cream Cheese, softened to room temperature
  • 2 ounces sugar
  • 2 teaspoons green tea powder
  • 1 1/2 cups semisweet chocolate chips
  • 2 eggs
  • 1/2 cup white sugar
  • 2 tablespoons butter
  • 2 tablespoons water
  • 1/2 teaspoon vanilla extract
  • 2/3 cup all-purpose flour
  • 1/4 teaspoon baking soda
  • 1/2 teaspoon salt

DIRECTIONS

  1. Preheat the oven to 325*F. Grease an 8×8 inch square pan.
  2. In a medium saucepan, combine the sugar, butter and water. Cook over medium heat until boiling. Remove from heat and stir in chocolate chips until melted and smooth. Mix in the eggs and vanilla. Combine the flour, baking soda and salt; stir into the chocolate mixture. Spread evenly into the prepared pan.
  3. Mix together softened cream cheese, sugar, green tea powder well.
  4. Drop Green tea cream cheese mixture onto sections the chocolate mixture and use a toothpick to draw the Green Tea mix across the brownie to create a look like marble.
  5. Bake for 25 to 30 minutes in the preheated oven, until brownies rise. Do not overbake! Cool in pan and cut into squares.
  6. Serve and enjoy!

I do not always copy and paste an entire article…this time I did just so you are not jumping screens.  This is such a great website for ideas.

http://realwomenofphiladelphia.com

Enjoy cooking

Tammye Honey

What Can I Make with Peanut Butter (Besides PB & J)?


Straight from http://realwomenofphiladelphia.com/blog/post/what-can-i-make-with-peanut-butter-besides-pb-j

I could not think of three ideas that are better…

What Can I Make with Peanut Butter (Besides PB & J)?

Mar 11, 2013

Happy Monday!

We love peanut butter: crunchy or creamy, it’s the perfect spread on an apple or warm slice of toast, and you can never go wrong with a classic pb & j.

But what else can we make with peanut butter?

Thanks to the talent and creative skills in this online cooking community of ours, peanut butter has been transformed.

GZKh1gRFru4puGmXNJOaBuCL.png:Amazon:photo

A. Peanut Butter fanatics, this is it: smooth caramel, decadent chocolate and that nutty flavor we LOVE! Grab this CANDY BAR CHEESECAKE SWIRL BROWNIES recipe and make these tonight!

B. Enjoy the creamy peanut butter and crunchy peanuts in this SWEET AND SOUR THAI CHICKEN recipe. Make sure there’s enough for seconds…

CWjtEsezBvtRgYhcdDCH3P8H.png:Amazon:photo

C. Rich chocolate, bananas, white chocolate curls, and creamy peanut butter inside? Heaven. ThisCHOCOLATE-PEANUT BUTTER MOUSSE PIE recipe is tonight’s dessert, and maybe tomorrow’s too…

So how do you want to eat peanut butter? A, B or C? Tough choices. Leave us a comment!

Happy Cooking

Tammye Honey

Dinner In A Hurry


When I found out that I was going to have hungry grandchildren to visit yesterday I wanted to make something quick and easy so that I could sit and visit while it cooked.  Due to a time crunch on the visit as the boys had to return home to get ready for school for today it had to be a quick meal.  Their mom had said that she could pick up a pizza on the way.

Homemade and nutritious for me always wins hands down.  I said I had already started to just come and visit.

I took chicken thighs and placed them in my roaster pan where I poured Wishbone Lite Italian Dressing on them enough to well coat them.  I covered with foil and placed them in the oven at 350 F.

I then proceeded to peel potatoes.  Both yellow butter and Red potatoes since I did not have enough of the yellow butter ones.  I placed them in a pan of water cubed with a hint of sea salt and let them boil with the cover slightly ajar.

I then took one container of Vanilla Yogurt, a container of Sour Cream, several varieties of fruit that I had (Mine were canned although frozen do work well) and 1/4 cup of marshmallows  I mixed them together in the bowl and let them sit in the fridge.

I was able to sit and visit, only being interrupted by my timer every fifteen minutes to turn the chicken.

The potatoes were finished and we added one stick of butter and one container of sour cream to whip them with the beater..

The thighs were done and we ate.  The meat fell easily from the bone and was very tender.  To have the boys comment how good the chicken was felt good.

They were surprised when I said that I had dessert.  First response was “What is that?”  I handed each a fork to stick in the mixture to taste.

Each had a big bowl of it and the last one finished the bowl.  I had a bag of coconut on the side to sprinkle on the top if the wanted it.  (I do not care for coconut so it always is a side option for me.)

A side salad was the other option which was offered.  Simple cherry tomatoes and romaine lettuce with a choice of dressings.

Complete meal that was quick and easy with no measuring and I was able to spend time with my guests.

Thank you for reading.

Tammye Honey

Split Pea Soup with Ham Hocks


So yesterday while on the telephone with a friend we were discussing how tight the grocery budgets are that we both have.

the phonehttp://images.search.yahoo.com/search/images;

While shopping with hubby, I had noticed how reasonable that fresh from scratch beans are priced.  So I picked up several varieties since at our age of slightly over 21 we require a little fiber in our lives now.

I had picked up a bag of Split Peas and had sent hubby on a quest to get some ham or a pork family relative to put with it… Meeting him there we carried on a discussion of the various varieties of choices and landed with ham hocks.  (if you are a Vegan leave them out and if you do not eat pork then add chicken or turkey)  This is a simple swap out.

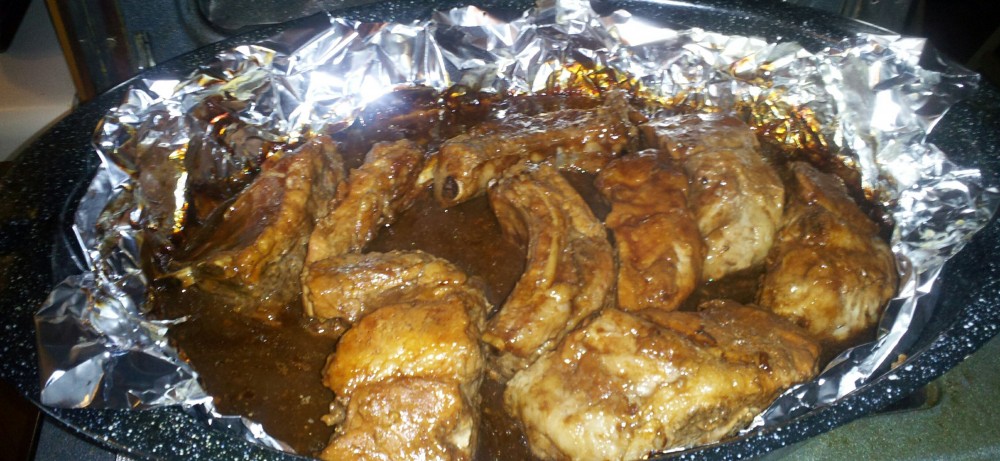
They were a very inexpensive choice which were left with a lot of meat in a vacuum sealed bag for less than $5.00 for 4 very large bones.

ham hockBefore you start saying yuck, how disgusting…think about it…there is lots of meat that you are going to boil off in vegetable broth with a lot of vegetables then throw away the skin and the fat….they are just cooking for the flavor….

Another alternative is to get a pre-trimmed  piece such as this one

ham hocks

These really are closer to pork chops…

If you are Vegan then just place in the vegetable broth, onion, carrots and celery with your split peas and you are totally good to go…

Allow to boil and then let it simmer for a while.

Stir it often.  I leave my lid slightly ajar so that some of the steam is allowed to escape.  The split peas will cook down and the broth will become thick.

Now some people add brown rice, some add potatoes I just add crackers and eat…

split pea soup1

For all of you who are Vegan’s the non meat version is great for you

split pea soup

I have a friend (who was on the phone with me while I was making this) who was from England and she said that she was making this but not as a soup…and serving with vinegar and fish and chips.  Just the split peas.

So there you go a few ideas for food on a budget.

While I was blogging I was lucky enough to find these great blogs about the same idea also so thought I would pass them along to you also….

Happy Cooking and don’t forget that if you really use your noodle you can cook on a budget  and eat healthy… our meal came to less than $ 10.00 and I will freeze half of it… we could not eat anywhere for $ 5.00 for two people and guess what?  Even with freezing half we will each have a bowl today also…guess that makes it $ 2.50 for two people… Think we just beat McDonald’s and Wendy’s Dollar Menu since our meal is more nutritious and filling.

Sorry Ronald and Wendy.

Love and Hugs to all and Healthy Eating

Tammye

Guest Blogger on The Ranting Chef


So happy to be a guest blogger here today…check out this great Chef daily for some really great recipes… The Ranting Chef…Thank You for this opportunity to be a Guest Blogger on Your Site…

ranting chef

The Ranting Chef

chicken

Vagabond Chicken

5 Chicken Thighs

2 Red Delicious Apples (Cored, Peeled and Chopped)
1/4 cup of Shredded Sharp Cheddar Cheese (Kraft Foods)
1/4 cup of Feta Cheese (Athenos)
1/4 Cup of Mediterranean Herb Cheese (Cracker Barrel)
4 cups of homemade bread cubes
2 tbsp butter
1/2 cup of dry white wine (Beechaven is a local winery)
1/2 cup vegetable (or Chicken) Stock
1 tbsp water
1 1/2 tsp potato starch (or rice starch)
My sauce:  1/2 cup dry white wine, 1/2 cup vegetable broth, 1 cup apple sauce (unsweetened) with a generous addition of cinnamon, nutmeg, salt, white pepper, vanilla and honey to taste.  I added the Potato Starch to thicken.
1. Combine apple, cheese, and bread crumbs. Set aside.
2. Flatten chicken breasts between sheets of waxed paper to 1/4 inch thickness. Divide apple mixture between chicken breasts, and roll up each breast. Secure with toothpicks.
3. Melt butter or margarine in a 7 inch skillet over medium heat. Brown stuffed chicken breasts. Add wine and 1/4 cup water. Cover. Simmer for 15 to 20 minutes, or until chicken is no longer pink.
4. Transfer chicken to a serving platter. Combine 1 tablespoon water and cornstarch; stir into juices in pan. Cook and stir until thickened. Pour gravy over chicken, and garnish with parsley. Serve.
Hope you do not mind the modifications, the taste was great and even hubby liked it all…

Hope you enjoy both his blog site and my recipe….See his original version of this recipe also as mine has been modified due to corn allergies.

Have a delicious day….

Tammye Honey

Rantings of an Amateur Chef

Very few recipes are meant to be static. They are best as they evolve and every different chefs put their own special take on them. I am really happy that today’s guest blogger, Tammye from tammyehoney, has taken a recent recipe that I posted and made it her own. Check out Tammye’s version and check out her site tammyehoney

My husband is a retired Warrant Officer from the Army.  We were married on 9/9/2009 without realizing the date… We live in a small rural community called Woodlawn, TN which is just outside of Clarksville, TN and Ft. Campbell, KY.  We have a quaint ranch home with a few acres of land that is just enough to keep our two dogs and two cats happy.  (Also our lawn care people who are locals).  We have a fixed income since he has the pension and I am disabled.  Cooking is something…

View original post 504 more words

2012 in review


The WordPress.com stats helper monkeys prepared a 2012 annual report for this blog.

Here’s an excerpt:

The new Boeing 787 Dreamliner can carry about 250 passengers. This blog was viewed about 1,200 times in 2012. If it were a Dreamliner, it would take about 5 trips to carry that many people.

Click here to see the complete report.

Take the Pledge and Win!


Take the Pledge and Win!.

http://nopetstorepuppies.com/

We have two adopted cats and two adopted dogs…they are a part of our family

From our home to yours, Happy Holidays…

CIMG1414

Trina

CIMG0151Peachy

CIMG1418T.C. (Tough Cat)

CIMG1448D.C. (Damn Cat)

We would not trade them for all the money in the world…they are all precious and each has their own personality…

Support the cause please….

Happy Holidays,

http://www.youtube.com/watch?feature=player_embedded&v=LvT6XTMv1ag#t=0s

cats against puppy mills

Braided Herb Bread in Bread Machine


This was a stumble upon find this morning so while I am baking my version I thought I would share the original with you…

http://www.beehiveandbirdsnest.com/2011/03/braided-herb-bread.html

Braided Herb Bread takes about 3-3 1/2 hours from start to finish, but most of the time is for rising and baking. I like to make the dough in my bread machine because it’s so simple. But you can just as easily make it in a mixer. Or by hand if you’re a total Luddite.

The ingredients:
1 egg, beaten
3/4 cup milk
1/2 cup water
1/4 cup butter (cut into 4 pieces)
4-4 1/2 cups flour
3 Tbs. sugar
1 1/2 tsp salt
1 1/2 tsp. dried marjoram
3/4 tsp. dried thyme
3/4 tsp. rosemary crushed (You can pinch it a bunch of times in your hand. Close enough.)
3/4 tsp. dried dill
2 packs yeast (or 4 1/2 tsp if you have bulk yeast. I prefer instant or quick rise.) Respect the expiration date. If the date has passed, throw it out. Trust me.

(If you don’t have all of these spices just omit whatever.)
In a microwave-safe medium-sized bowl, beat an egg. Add milk, water and butter.
Microwave on HIGH for about a minute and a half until the mixture is 120º-130º. One of my best friends in the kitchen is a thermometer. I like the ones with the long cable because they are easier to read than ones that have the readout on the thermometer itself. If you’re going to buy one, make sure it goes up to 375º or so. That way you can use it for frying as well. I bought a kitchen thermometer once without realizing that it was specifically for meat and it only had readouts up to 225º. Bummer. This one by Polder is wonderful. It’s about $20. You need it.

Pour the milk mixture into your breadmaker (or your mixing bowl if you’re using a mixer instead). Then add the rest of the ingredients in the order listed. I like to add about 4 1/4 cups of flour unless it’s a really humid day. Then I’ll add 4 1/2. (If you’re using a mixer, mix all the dry ingredients together first. If you are using a mixer AND regular old yeast, put the yeast in the bowl with the milk mixture. Let it sit for about 10 minutes or so. This is called proofing. It’s a drag and you don’t have to do it if you use Instant or Rapid-rise yeast. Now you know. Carry on with the rest of the recipe.)

(see that writing on the side of my bread machine pan? When I find a recipe that I love and make all the time, I write it on the side with a sharpie, that way I don’t have to get out my cookbook. That is just way too much work. I have recipes on all four sides of this pan.)

Set your bread maker on the dough setting (or whatever setting that will mix the dough and let it rise without baking it.) If you are using a mixer, knead the dough for about 8 minutes, then let it rise til it’s doubled in size. It will still be kind of lumpy and jaggedy. That’s quite all right.
Now you’ll take the dough and turn it out onto a floured surface. If it’s sticky add some more flour. You’ll knead it for a minute or so, then divide it into three equal sections (this makes a big ol’ loaf of bread, so if your family is on the smaller side you might want to make two smaller loaves and give one to a neighbor. They will love you! If that’s the case, divide the dough into six equal pieces–three for each loaf– and carry on just the same. Bake the smaller loaves on the same cookie sheet, but for about 6-10 minutes less.)

You will then roll each of these sections into a long, thin snakey-looking shape about 20-24 inches long (14-18″ if you’re making two smaller loaves). You can roll it out any way that catches your fancy, just don’t try to pull it that long; it will rip. Once you’ve made snakes out of all three sections of dough, pinch the ends together tightly on one side only.

Now we’re going to braid your bread! This will feel so blissfully domestic your head will almost explode. Feel free to call everyone around to admire your handiwork. (Remember to pinch the other end of your braid when you’ve finished!)

At this point you will pick up one end and gently tie the braid in a knot around itself, tucking the ugly ends underneath. This sounds complicated but it’s not. Promise.

Gorgeous! Now you’ll put your loaf on a cookie sheet and let it rise in a warm place until the dough has almost doubled in size (about 30-45 minutes depending on how warm the yeast is). Preheat your over to 350º and move the shelves around so there is plenty of room for your bread to grow. This sucker is going to get pretty big.)

Here is a nifty trick I use all the time when baking bread. Loaves tend to get quite brown on top by the time they’ve cooked all the way through. I hate really brown bread. It’s ugly and it’s usually really hard. So I bake my bread with a paper towel over the top. It allows the bread to brown, but not excessively. It will not burst into flames (unless you touch it against the heating element but I’ve only done that once in my whole life).
Bake the bread for about 30-40 minutes until it’s done. But how are you supposed to know when it’s done exactly? Some people suggest turning the loaf over and tapping it to see if it sounds hollow. But who wants to touch 350º bread? Plus I don’t think bread really sounds all that hollow. Here is the way to tell if your bread is done: Get out your thermometer again. Bread is perfect when it’s 190º. Stick the thermometer into the middle of the loaf after 30 minutes and see what it says.

Remove your bread from the oven and slide it onto a cooling rack. Get a chilly stick of butter out of the fridge and unwrap it a bit. Rub the butter all over the loaf so it’s nice and shiny. I serve my Braided Herb Bread on a platter wrapped in a clean tea towel. Since it’s got such a lovely taste (and since you just rubbed butter all over the outside), it doesn’t really need to be served with butter. I just let everybody tear off a piece and pretend we’re French peasants. This bread definitely looks amazing, but it also tastes amazing. People will love you for this!

Happy baking!

I am going to try a Corn Free and Gluten Free version of this with my new King Arthur Gluten Free Flour… and am digging out one of many bread makers from the archive files in the laundry room… so enjoy… I promise to take pictures…