Beef and Broccoli


Thanks to a good friend of mine from Facebook Ann Ball, who publishes recipes daily

(For more recipes, motivation and inspirations join My Weight Support Group: www.facebook.com/groups/aspiredtotransformation

Always looking for new Friends. FRIEND MEhttps://www.facebook.com/ann.ball.73 )

I happened to have stumbled across this recipe the other day and modified it slightly due to my corn allergy.  I still have not found a substitute for soy sauce so it was not totally corn free (sadly) so the allergy pills still had to be taken each time I ate it.  I decided to make just enough rice per each meal so that the rice was hot and fresh each time that we ate.  We had several meals from this dish and I took the left over gravy and froze it to use as a base for the next time that I make the dish.

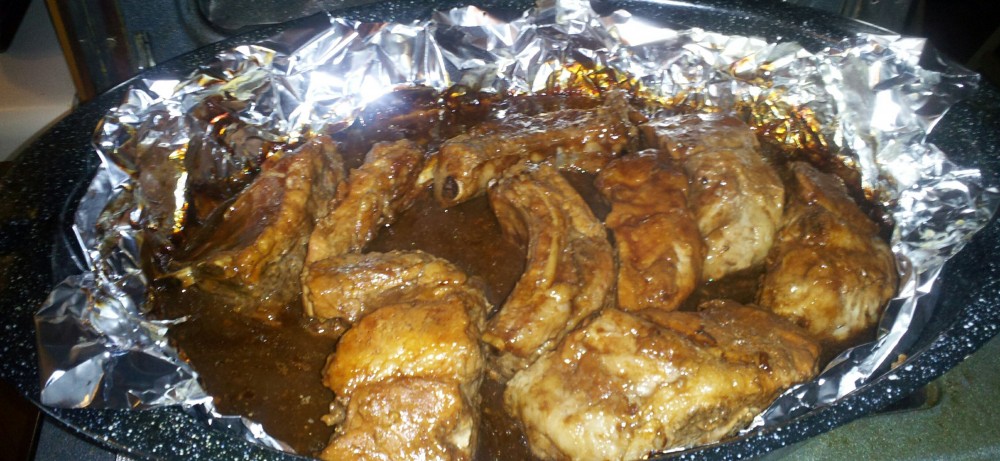
Crock Pot Beef and Broccoli

10300079_10204015023721400_6278386827162361306_n

Ingredients:
1 pound boneless beef chuck roast, sliced into thin strips
1 cup beef or chicken consumme or broth
1/2 cup soy sauce
1/3 cup brown sugar
1 tablespoon sesame oil (I put in 2 tbsp)
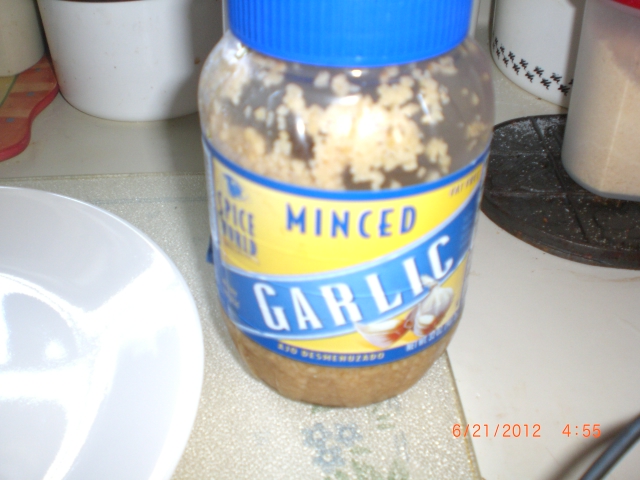
3 garlic cloves, minced (I put in 3 heaping tbsp minced garlic in olive oil)
2 tablespoons cornstarch (I used potato starch in its place)
2 tablespoons sauce from the crock pot after being cooked
Fresh broccoli florets (as many as desired) I used frozen
Hot cooked rice

Directions:
1. Place beef in a crock pot.
2. In a small bowl, combine consomme, soy sauce, brown sugar, oil, and garlic. Pour over beef. Cook on low for 6-8 hours.
3. In a cup, stir cornstarch and sauce form the crock pot until smooth. Add to crock pot. Stir well to combine.
4. Add broccoli to the crock pot. Stir to combine.
5. Cover and cook an additional 30 minutes on high (the sauce has to boil for it to thicken).
6. Serve over hot cooked rice.
Source: Xtreme Fat Loss Diet

This is a new favorite in our home that actually got my hubby to like broccoli even more.  Hope that You like it as well.

Have a great day,

Tammye Honey

An Irish Dessert


So today I am all about the Irish…Hey now my last name is Green lol…

This one is courtesy of another great site I love http://www.chow.com

Chocolate Guinness Cupcakes


Chocolate Guinness Cupcakes

Adapted from Dave Lieberman

I love cooking with beer, and that’s no exception when it comes to desserts. Of all beers, Guinness is the perfect one for desserts because of its distinct chocolate and coffee notes. Pairing it with actual chocolate is the obvious choice. These cupcakes are light in texture but heavy in the chocolate department. The white cream cheese icing reminds me of the creamy white head that Guinness is famous for.

This dish was featured as part of ourSt. Patty’s Day Recipes photo gallery.

TIME/SERVINGS
Total Time: 50 mins
Active Time: 25 mins
Makes: 24 cupcakes

INGREDIENTS
For the cupcakes:
Unsalted butter, melted, for coating the muffin pans (optional)
1 (11.2-ounce) bottle Guinness stout
1/2 cup whole milk
1/2 cup vegetable oil
1 tablespoon vanilla extract
3 large eggs
3/4 cup sour cream
2 1/2 cups all-purpose flour
2 cups granulated sugar
3/4 cup natural unsweetened cocoa powder
1 1/2 teaspoons baking soda
1/2 teaspoon fine salt

For the frosting:
1 (8-ounce) package cream cheese, at room temperature
Pinch fine salt
1/3 cup heavy cream
1 pound powdered sugar
Natural unsweetened cocoa powder, for dusting

INSTRUCTIONS

For the cupcakes:

  1. Heat the oven to 350°F and arrange a rack in the middle. Place cupcake liners in two (12-well) muffin pans; alternatively, coat the wells with melted butter. Set the pans aside.
  2. Whisk together the Guinness, milk, vegetable oil, and vanilla in a large bowl until combined. Whisk in the eggs, one at a time, until completely incorporated. Whisk in the sour cream.
  3. Whisk the flour, sugar, cocoa powder, baking soda, and salt in a second large bowl to aerate and combine. Gradually fold this mixture into the wet Guinness mixture. Divide the batter among the muffin wells.
  4. Bake until a toothpick inserted into the center of the muffins comes out clean, about 20 to 25 minutes. Set the pans on a wire rack and let the cupcakes cool completely before removing from the pans.

For the frosting:

  1. Place the cream cheese and salt in the bowl of a stand mixer fitted with a paddle attachment and beat on medium speed until light and fluffy, about 2 minutes. With the mixer on medium speed, gradually beat in the heavy cream until smooth, about 1 minute. Scrape down the sides of the bowl with a spatula. With the mixer on medium speed, gradually mix in the powdered sugar until completely incorporated and smooth, about 3 minutes.
  2. Top each cupcake with a heap of frosting and dust with cocoa powder.

Happy Baking and preparing for your festivities… hope this helps

Tammye Honey

Recipes in Time for St. Patrick’s Day


No Pinching Here: Five Green Dishes for St. Patrick’s Day!

Mar 13, 2013
1 OF 7


Hello Everyone!

Looking for a green dish to help you celebrate St. Patrick’s Day? Look no further.

We’ve got five recipes that won’t get you pinched, all created by Real Women like you in our wonderful online cooking community!

Click through our slideshow to get recipes for these delicious green dishes and test your Irish food knowledge on each slide—answers are at the end, tell us how many you got right!

Smashed Peas & Mint

Attached Recipe Photo
MEHMEH

posted Oct 15, 2010

I love peas mostly fresh but frozen too. I even grew my own for awhile… so good. One day while visiting my parents, my mom (not a huge veggie fan) said let’s do something different with the peas… mashed… maybe?….it has been a family favorite since then…

INGREDIENTS

  • 10 ounces 2 – 10 oz bags frozen peas
  • 1 cup milk
  • 4 ounces PHILADELPHIA Cream Cheese
  • 5 tablespoons butter
  • 2 tablespoons mint, finely chopped

DIRECTIONS

  1. Thaw and drain the peas
  2. In a medium saucepan roughly mash the peas; Add the butter, 1 tsp salt and 1/8 tsp ground pepper and cook over low heat
  3. Add the cream cheese and milk until well blended; Add the mint, stirring until bubbly

Green Beans and Sautéed Potatoes


Smoky bacon, hearty potatoes, fresh cut green beans—we’ll be honest, you’re going to want to make this for St. Paddy’s day and then some…

GET THE RECIPE

Fresh Cut Green Beans, Sauteed with Potatoes, Bacon and Onions

Attached Recipe Photo
Rebecka EvansRebecka Evans

posted Aug 1, 2012

This recipes is one of my favorite summer fresh creations. Filled with flavorful memories of hot summer days in the garden with mom, the crisp cut green beans snap alongside the creamy texture of the sauteed potatoes and onions. Bacon rounds out the dish with its savory smoke flavor. The simple flavors of summer express themselves in perfect harmony in this basic side dish!

INGREDIENTS

  • 1 pound fresh cut green beans
  • 1 medium onion
  • 4 medium potatoes
  • 1/4 pound bacon
  • 2 tablespoons butter
  • 2 scallions
  • 1/4 cup red wine vinegar

DIRECTIONS

  1. Cook bacon in a large cast iron skillet over medium heat until crisp, remove bacon and all but 1 tablespoon bacon fat
  2. melt 1 tablespoon butter in pan
  3. add potatoes and onions and cook covered, stirring frequently until potatoes are tender but not soft
  4. add cut green beans, remaining 1 tablespoon butter, cover and cook for 12-15 minutes, stirring occasionally
  5. salt and pepper to taste
  6. serve with red wine vinegar, garnish with chopped scallions

Lettuce Soup


Serve up a warm bowl of green soup. Fresh mint, broth, iceberg lettuce—your taste buds will thank you.

GET THE RECIPE

Minty Lettuce Soup

Attached Recipe Photo
MEHMEH

posted Sep 24, 2010

I love serving soup in a shot glass as an appetizer. You would never guess it’s lettuce. How many times have you had to throw out the lettuce because it turned brown in the crisper (or rotter as I call it)? Now you can put it to delicious use.

INGREDIENTS

  • 2 heads iceburg lettuce, roughly chopped
  • 1 cup onion, sliced
  • 1/2 cup packed fresh mint
  • 6 cups chicken broth
  • 2 tablespoons butter
  • 2 tablespoons all purpose flour
  • 4 ounces PHILADELPHIA Cream Cheese

DIRECTIONS

  1. Put the lettuce, onion, mint and chicken broth in a large pot
  2. Bring to a boil then lower heat to medium and simmer for 25 minutes
  3. Let cool slightly then place in a blender for one minute and strain the soup. (You will have to do this in 2 stages to not fill the blender too much) set aside;
  4. Melt the butter in a medium pan over medium heat, add the flour and stir one minute
  5. Add the soup and stir to combine. Bring to a boil, stirring constantly
  6. Remove from heat, add the cream cheese and salt & pepper to taste
  7. Tip: You can serve this soup in shot glasses; add a sprinkle of parmesan cheese and a fresh mint leaf to decorate
  8. Tip: You can use any lettuce you have on hand and for a vegetarian meal you can use vegetable broth

Green Guacamole


Rich and creamy guacamole? Make an extra batch because you won’t be able to put this down!

GET THE RECIPE

Awesome Guacamole

Attached Recipe Photo
Erika ChristianErika Christian

posted Aug 3, 2012

Rich and creamy guacamole, hard to stop eating!

Tags: None

INGREDIENTS

  • 8 ounces Philadelphia whipped cream cheese
  • 3 Ripe avacadoes
  • 1 packet of guacamole seasoning mix (your choice)
  • 1 pinch garlic salt (season to your taste)

DIRECTIONS

  1. Peel and remove seed from avacadoes then mash in a bowl.
  2. In the same bowl mix in the whipped cream cheese.
  3. Stir in seasoning packet and garlic salt.
  4. Place in fridge for 20 min to bring out flavor.
  5. Serve with tortilla chips and enjoy!

Green Brownies


They’re rich with chocolate and they’re green? What’s the special ingredient that makes these brownies pinch-free? Find out…

Green tea Cream cheese Brownies

Attached Recipe Photo
Yumiko EtoYumiko Eto

posted Sep 16, 2011

These brownies are rich and chocolaty, and absolutely fabulous! Green tea cream cheese mixtures make these brownies outstanding! A little bite is not enough. Every time I make these brownies, I put them as snack’s in my girls’ school lunches. After they come back from school, they tell me, ” Mommy, those brownies are very popular among my friends! Next time put more brownies in my lunch, PLEASE!!”

INGREDIENTS

  • 5 ounces Philadelphia Cream Cheese, softened to room temperature
  • 2 ounces sugar
  • 2 teaspoons green tea powder
  • 1 1/2 cups semisweet chocolate chips
  • 2 eggs
  • 1/2 cup white sugar
  • 2 tablespoons butter
  • 2 tablespoons water
  • 1/2 teaspoon vanilla extract
  • 2/3 cup all-purpose flour
  • 1/4 teaspoon baking soda
  • 1/2 teaspoon salt

DIRECTIONS

  1. Preheat the oven to 325*F. Grease an 8×8 inch square pan.
  2. In a medium saucepan, combine the sugar, butter and water. Cook over medium heat until boiling. Remove from heat and stir in chocolate chips until melted and smooth. Mix in the eggs and vanilla. Combine the flour, baking soda and salt; stir into the chocolate mixture. Spread evenly into the prepared pan.
  3. Mix together softened cream cheese, sugar, green tea powder well.
  4. Drop Green tea cream cheese mixture onto sections the chocolate mixture and use a toothpick to draw the Green Tea mix across the brownie to create a look like marble.
  5. Bake for 25 to 30 minutes in the preheated oven, until brownies rise. Do not overbake! Cool in pan and cut into squares.
  6. Serve and enjoy!

I do not always copy and paste an entire article…this time I did just so you are not jumping screens.  This is such a great website for ideas.

http://realwomenofphiladelphia.com

Enjoy cooking

Tammye Honey

Can You Unscramble These Tasty Treats?


Can You Unscramble These Tasty Treats?

Try uncovering the names of these desserts without clicking the link—use their ingredients as clues! Leave us a comment telling us how many you unscrambled but don’t look down at others’ answers!

lPKYntLo4NFqQr6lyESrjAyF.gif:Amazon:photo

Recipe clues: 1 / 2 / 3 / 4

How many did you unscramble? Tell us below and if you like what someone else said, hit the “thumbs up” button on their comment! If you haven’t tried this new feature, you must!

 Excerpt Photo Source

http://realwomenofphiladelphia.com/blog/post/can-you-unscramble-these-tasty-treats

So let me know how many you were able to do and if this was fun for you…I love a brain teaser and when it has to do with food it is even more fun for me.  Let me know how you feel.

Thank you for reading

Tammye Honey

Dinner In A Hurry


When I found out that I was going to have hungry grandchildren to visit yesterday I wanted to make something quick and easy so that I could sit and visit while it cooked.  Due to a time crunch on the visit as the boys had to return home to get ready for school for today it had to be a quick meal.  Their mom had said that she could pick up a pizza on the way.

Homemade and nutritious for me always wins hands down.  I said I had already started to just come and visit.

I took chicken thighs and placed them in my roaster pan where I poured Wishbone Lite Italian Dressing on them enough to well coat them.  I covered with foil and placed them in the oven at 350 F.

I then proceeded to peel potatoes.  Both yellow butter and Red potatoes since I did not have enough of the yellow butter ones.  I placed them in a pan of water cubed with a hint of sea salt and let them boil with the cover slightly ajar.

I then took one container of Vanilla Yogurt, a container of Sour Cream, several varieties of fruit that I had (Mine were canned although frozen do work well) and 1/4 cup of marshmallows  I mixed them together in the bowl and let them sit in the fridge.

I was able to sit and visit, only being interrupted by my timer every fifteen minutes to turn the chicken.

The potatoes were finished and we added one stick of butter and one container of sour cream to whip them with the beater..

The thighs were done and we ate.  The meat fell easily from the bone and was very tender.  To have the boys comment how good the chicken was felt good.

They were surprised when I said that I had dessert.  First response was “What is that?”  I handed each a fork to stick in the mixture to taste.

Each had a big bowl of it and the last one finished the bowl.  I had a bag of coconut on the side to sprinkle on the top if the wanted it.  (I do not care for coconut so it always is a side option for me.)

A side salad was the other option which was offered.  Simple cherry tomatoes and romaine lettuce with a choice of dressings.

Complete meal that was quick and easy with no measuring and I was able to spend time with my guests.

Thank you for reading.

Tammye Honey

Kimchi How to make and Keep it


I found two similar recipes for it and my hubby has found an amazing way to store it since we can’t get the actual Korean Kimchi storer from Tupperware.  We came up with the next best item from Tupperware.

pickadeli1

This is an 8 1/2 cup or 2 L container

http://www.trifood.com/kimchi.asp

Kimchi is a national Korean dish consisting of fermented chili peppers and vegetables, usually based on cabbage. It is suspected that the name kimchi originated from shimchae (salting of vegetable) which went through some phonetic changes: shimchae > dimchae > kimchae >kimchi.Common ingredients include Chinese cabbage, radish, garlic, red pepper, spring onion, ginger, salt, and sugar. While kimchi is generally identified internationally as Chinese cabbage fermented with a mixture of red pepper, garlic, ginger, and salted fish sauce, several types of kimchi exists, including regional and seasonal variations. There are variants, includingkkakdugi, based on radish and containing no cabbage.

Kimchi has been cited by Health Magazine as one of the world’s five “healthiest foods”, with the claim that it is rich in vitamins, aids digestion, and may even prevent cancer. The health properties of kimchi are due to a variety of factors. It is usually made with cabbage, onions, and garlic, all of which have well-known health benefits. It also has active and beneficial bacterial cultures, like yogurt. Lastly, kimchi contains liberal quantities of red chili peppers (gochugaru) which has been suggested to have health benefits as well.

The best tasting kimchi is stored in room temperature for an average of six months to reach its full flavor.  It is a popular side dish but is also often used as an ingredient in cooking other popular Korean dish, including kimchi chigae (kimchi soup) and kimchi bokumbop (kimchi fried rice).

Fun fact: Like the McDonald’s University of Hamburgers in Illinois, US, there is a Kimchi Research Institute located in Pusan National University, South Korea.

RECIPE INGREDIENTS
  • Head of Napa cabbage – about one pound
  • ¼-⅓ cup red chili pepper flakes
  • 1 tbsp minced garlic
  • 1 tbsp minced ginger
  • 3-4 green onions, sliced
  • 2 tablespoons anchovy or fish sauce (optional)
  • ½ yellow onion
  • ½ ripe apple
  • ½ ripe Korean pear
  • Sea salt
  • Water
COOKING DIRECTIONS
  1. Separate cabbage leaves and chop into bite-size pieces.
  2. Dissolve a quarter cup of sea salt in a bowl of warm water then pour salt water over cabbage leaves. Give cabbage a gentle toss to distribute salt water. Allow salted cabbage to sit for at least four hours.
  3. Give cabbage a good rinse to remove excess salt then transfer cabbage to a large bowl.
  4. Combine a quarter cup of fine red chili pepper flakes with warm water, stir gently with a spoon to create a red chili paste, then transfer chili paste to cabbage.
  5. Add minced garlic, minced ginger, green onions, and fish sauce.
  6. Blend yellow onion, apple, and pear with one cup of water, then add this natural sweetener to the cabbage.
  7. Put on a pair of plastic gloves and give everything a thorough toss and rubdown. You want to evenly distribute all ingredients, especially the red chili paste.
  8. Transfer seasoned cabbage leaves into a large glass bottle. Be sure to use firm pressure with your hands to push down on cabbage leaves as they stack up inside the bottle.
  9. Transfer any liquid that accumulated during the mixing process into the bottle as well – this liquid will become kimchi brine. Some liquid will also come out of the cabbage leaves as you press down on them as they are stacked in the bottle.
  10. Be sure to leave about 2 inches of room at the top of the bottle before capping it tightly with a lid. Allow bottle of kimchi to sit at room temperature for at least 24 hours.
  11. Refrigerate and take out portions as needed. The refrigerated kimchi will continue to ferment slowly in the refrigerator over time. So long as you use clean utensils to take out small portions, it will keep for up to a month in your refrigerator.

http://allrecipes.com/Recipe/Spicy-Cabbage-Kimchi/Detail.aspx?prop24=RD_NextRecipe

492927834391


2 of 2 photos

Serves: 56 change »

Prep Time: 1 Hour

Ready In: 4 Days 7 Hours

Ingredients
 2 heads Napa cabbage
  • 1 1/4 cups sea salt
  • 1 tablespoon fish sauce
  • 5 green onions, chopped
  • 1/2 small white onion, minced
  • 2 cloves garlic, pressed
  • 2 tablespoons white sugar
  • 1 teaspoon ground ginger
  • 5 tablespoons Korean chile powder
Directions
1.
Cut the cabbages in half lengthwise and trim the ends. Rinse and cut into pieces about 2 inch square. Place the cabbage into large resealable bags and sprinkle salt on the leaves so they are evenly coated. Use your hands to rub the salt in to the leaves. Seal the bags and leave at room temperature for 6 hours.
2.
Rinse the salt from the cabbage leaves and then drain and squeeze out any excess liquid. Place the cabbage in a large container with a tight fitting lid. Stir in the fish sauce, green onions, white onion, garlic, sugar and ginger. Sprinkle the Korean chile powder over the mixture. Wear plastic gloves to protect your hands and rub the chile powder into the cabbage leaves until evenly coated. Seal the container and set in a cool dry place. Leave undisturbed for 4 days. Refrigerate before serving, and store in the refrigerator for up to 1 month (if it lasts that long!).

Enjoy the Kimchi and keep it fresh

What is in the Fridge Today?


As I walk to my fridge and look I am faced as many women with the task of being inventive and still staying on budget.

So far my ingredients include

CIMG2499CIMG1380

CIMG0223

CIMG1381

CIMG2496

Perhaps some chicken or beef…have not decided yet but this is my starting block for dinner.  Since it is not grocery day I have to work with what I have in the house.  I do not feel like soup so a type of empanada it is.

Hubby was no help when I asked him what he wanted and he said whatever I am having.

As I am going through our mini freezer, what do I stumble upon but a ready made meal.

meal in a bag

I will have to take an allergy pill but with coupons I paid next to nothing for this and the chicken was on sale too.

Contessa makes a great line of quick meals for two. Or for one with leftovers for next day. Look for coupons as they are always available too.  I add meat to mine as hubby likes lots of meat.

chicken

Perdue is now feeding their chickens without chemicals and organic.  They are not abusive so I try to stay clear of off brands that might be a deal but not good.

Thank goodness for coupons and being able to use them…

I guess the left over chicken will be the empanadas of tomorrow… and dinner is made for tonight…so I can clean today.  Yeah! I need to read the 12 secrets to planning meals why don’t you peek at it too?  Tell her I sent you please…Thank you.

One of my readers http://stuphblog.wordpress.com has asked what is an empanada so here I am adding an explanation of one of the easiest meals to make for a quick dinner.

CIMG1378

You start with an shell…CIMG1380

I love this brand as it is made with flour base that does not have bromine and no Corn…

CIMG1379

I add my hubby’s favorite cheese

CIMG0057

Medium Heat on the stove for the frying pan or griller

CIMG1345

I spray the pan with Pam to not have a greasy empanada

chicken

I cut my chicken into strips and brown them on both sides or brown hamburger or stew beef or turkey burger….

Here is where it gets fun….

You can add…Onions

CIMG2496

Diced up and brown in the meat while it is cooking

Green peppers or hot peppers if you so choose

Spinach if you want to be healthy

CIMG2509Then set aside after cooked and partially cooled.

In a clean pan that has been sprayed with the Pam cooking spray

Add your tortilla shell then on half of the shell add your meat mixture.  Around the edges I sprinkle my favorite cheese as well as across the top.

Then fold over the other half so that it seals with the cheese. Press down with your spatula.  Brown on both sides then serve with

CIMG1381

This is to dip your empanada in

Enjoy

Tammye Honey

Healthy Eating in a Pot


There is nothing nicer than cooking everything in one pot and then letting it simmer for dinner.

My hubby’s favorite way to eat eggplant is to dip it in egg, then in Italian breadcrumbs and deep fry it in my wok in Olive Oil.

deepfried eggplant


I love the draining rack on the side which also keeps the eggplant warm till he sneaks in and eats them lol.

The recipe for the pot of yummy is as follows:

1 medium onion diced

3 tbsp minced garlic

1 chopped eggplant

1 cup cherry tomatoes cut in half

1 cup sliced fresh mushrooms

1 pound ground beef or turkey

Olive Oil for bottom of pot.

I add the olive oil, onion and the hamburger to brown the hamburger then drain off the excess fat.  I add the remaining ingredients and allow to simmer till everything is cooked thoroughly.  (Takes about 30 minutes)

Today I had a little leftover spaghetti sauce and a few bowtie macaroni’s so I added them to the mixture and stirred well.

covered pot eggplant stewAdding a small tossed salad and the meal is complete.  Good for you low cost and yummy.

Happy Eating.

Tammye Honey


Homemade Shrimp Bisque


After reading a fellow blogger’s post this morning, I was suddenly starving and drooling for a homemade soup since it is so cold outside.

cold weather

Did you say hush… oh you sound just like my hubby…guess you are right…it could be worse, I could be braving the New York State Winter like I used to as I am letting the dogs out in my slippers and sweat shirt lol….

http://rantingchef.com/2013/01/22/soup-roulette/

In case you are wondering what inspired me this morning…. Hey where are you going?

Okay , he is great and has some really great recipes and some great guest bloggers on his site too.  I have even guest blogged there before.  Hurry back as I am about to give you the lowdown on my recipe.

Thanks for coming back, phew…was worried there for a second.

sweating picture1


Since my allergies are so bad to corn, I use all natural ingredients and fresh ingredients as much as possible in our foods so that I am not running for my allergy medication or even worse, my epi pen.


I started my soup with a few simple ingredients that I just happen to have in stock.

CIMG2496


A medium onion

CIMG2497

Some potatoes either red or yellow

CIMG2498

Shrimp (Take the tails off)

CIMG2499

Daisy Brand Sour Cream

CIMG2500

Fresh Baby Carrots

CIMG2501

Fresh Celery

CIMG2502

Fresh Sliced Mushrooms

CIMG2503

Old Bay Seasoning

milk

CIMG2504

CIMG2506

Paprika (I happen to use the tube however this is fine)

CIMG2509

You can’t beat fresh baby spinach

(Had already thrown bag out when I realized I had not taken a picture sorry)

CIMG2510

Swanson does make it better for certain with their chicken broth

CIMG2508

My Vidalia Chopper is priceless in my kitchen for chopping my vegetables to a perfect size for all of my creations.  It is a must have for every kitchen.  It is quick and easy and super fast cleanup too.

I throw all my ingredients in the pot suited to how much of each item that we prefer as my hubby likes a lot more potato and more shrimp than the average person.  A full bag of spinach and easy on the mushroom, carrots and celery yet enough for flavor.  One to two containers of the sour cream depending on your taste and since my hubby does not like a thick soup I do not add a thickener and do add milk here…by now I am sure you know what milk looks like.  So I did not take a picture of our milk container.  Here would be a great spot to explain the thicker that I do use…I either normally use rice starch or potato starch and just a few teaspoons will do you.

Simmer slowly and enjoy the aroma till the veggies are soft.

Voila… serve in a bowl or to be creative in a bowl of carved bread.

Eat Healthy and enjoy,

Tammye Honey

Related articles

Split Pea Soup with Ham Hocks


So yesterday while on the telephone with a friend we were discussing how tight the grocery budgets are that we both have.

the phonehttp://images.search.yahoo.com/search/images;

While shopping with hubby, I had noticed how reasonable that fresh from scratch beans are priced.  So I picked up several varieties since at our age of slightly over 21 we require a little fiber in our lives now.

I had picked up a bag of Split Peas and had sent hubby on a quest to get some ham or a pork family relative to put with it… Meeting him there we carried on a discussion of the various varieties of choices and landed with ham hocks.  (if you are a Vegan leave them out and if you do not eat pork then add chicken or turkey)  This is a simple swap out.

They were a very inexpensive choice which were left with a lot of meat in a vacuum sealed bag for less than $5.00 for 4 very large bones.

ham hockBefore you start saying yuck, how disgusting…think about it…there is lots of meat that you are going to boil off in vegetable broth with a lot of vegetables then throw away the skin and the fat….they are just cooking for the flavor….

Another alternative is to get a pre-trimmed  piece such as this one

ham hocks

These really are closer to pork chops…

If you are Vegan then just place in the vegetable broth, onion, carrots and celery with your split peas and you are totally good to go…

Allow to boil and then let it simmer for a while.

Stir it often.  I leave my lid slightly ajar so that some of the steam is allowed to escape.  The split peas will cook down and the broth will become thick.

Now some people add brown rice, some add potatoes I just add crackers and eat…

split pea soup1

For all of you who are Vegan’s the non meat version is great for you

split pea soup

I have a friend (who was on the phone with me while I was making this) who was from England and she said that she was making this but not as a soup…and serving with vinegar and fish and chips.  Just the split peas.

So there you go a few ideas for food on a budget.

While I was blogging I was lucky enough to find these great blogs about the same idea also so thought I would pass them along to you also….

Happy Cooking and don’t forget that if you really use your noodle you can cook on a budget  and eat healthy… our meal came to less than $ 10.00 and I will freeze half of it… we could not eat anywhere for $ 5.00 for two people and guess what?  Even with freezing half we will each have a bowl today also…guess that makes it $ 2.50 for two people… Think we just beat McDonald’s and Wendy’s Dollar Menu since our meal is more nutritious and filling.

Sorry Ronald and Wendy.

Love and Hugs to all and Healthy Eating

Tammye